Experienced do-it-yourselfers can handle a host of home projects, but overconfidence and other issues occasionally derail their efforts and lead to wasted time, wasted materials and damaged homes. Veteran homeowners are particularly prone to a relatively small set of mistakes that they can learn to avoid, including…
Mistake: Starting to work without a full overview of the project. The more experienced a DIYer is, the greater the odds that he/she will make assumptions about necessary home repairs—assumptions about the cause and extent of a problem…and about how much time and what materials will be needed to fix it. These assumptions are especially common when problems are in spots that are hard to examine, such as inside walls or appliances, up in attics or on roofs.
Initial misdiagnoses themselves aren’t disasters, but they can lead DIYers down the path to disaster. Even worse: Homeowners often are tempted to push forward with repairs even after discovering that they don’t have the materials they need to do the job properly—after all, no one likes to stop mid-project for an extra trip to the home center. Misdiagnoses also can cause repairs to take much more time than expected, transforming homes into messy worksites for days as projects sit half done.
What to do: Before planning, scheduling or shopping for any DIY project, take an up-close look at the situation—even if you must climb a ladder or cut open a wall to do so. If you like to tackle DIY projects first thing Saturday morning, do this repair recon earlier in the week so you’ll have plenty of time to buy what you need and will avoid any temptation to get right to work even if things aren’t as expected.
Example: If a project involves painting or staining, make sure you have sufficient quantities of the paint or stain. If there’s even a small chance that you’ll need more, buy it and mix the old and new paint or stain together before breaking out a brush. If you start with the paint or stain you have but come up short, the old and new sections won’t quite match.
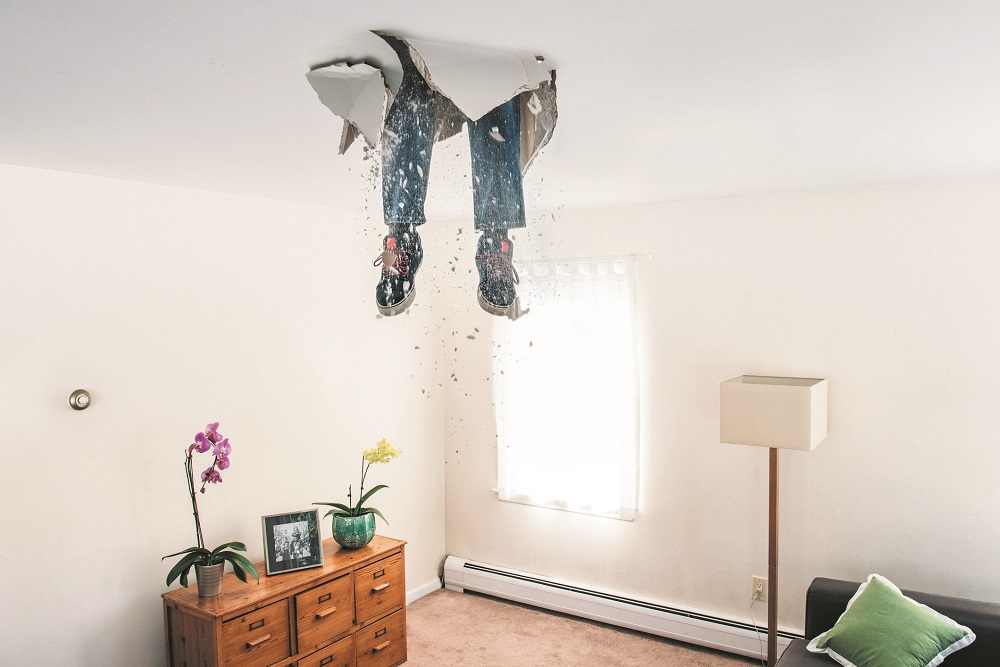
Mistake: Tackling projects that are almost impossible—or excessively risky—for amateurs. If even tiny imperfections will make the results look amateurish, hire a pro. Examples: Finishing drywall and pouring concrete—amateurs are perfectly capable of performing these tasks, but only people who do this work full-time know how to make it look great.
What to do: Homeowners can hang drywall and do the prep work for cement, but most should hire a pro to finish the drywall and pour the concrete. Exception: DIY is a viable option if the drywall or concrete is in an out-of-the-way location where aesthetics are not important.
Important: Always hire a pro for any electrical project where a mistake could cause a fire…any plumbing project that could result in major water damage…and any HVAC work that could ruin pricey HVAC components. “I think I can do it,” simply isn’t sufficient in these situations.
Mistake: Rushing drying times. Some tasks simply cannot be rushed. If you apply spackle, joint compound, paint or stain as part of a project, your next step is going to be to wait for hours or even days. For many homeowners, this is the most challenging step of all—it’s hard to step away from a task before it’s complete. But doing otherwise could ruin the project—if you paint spackle or apply polyurethane on stain that’s not completely dry, the result is going to look terrible.
What to do: Read product packaging before you begin a project to determine recommended drying times, then factor these times into your project’s schedule. And: Follow recommended drying times even if the product looks and feels dry hours earlier.

Mistake: Not measuring twice before making tricky cuts. Every DIYer has heard the advice “measure twice, cut once”—but how many truly follow this advice every time? Even people who begin projects heeding this sensible advice often set it aside when tasks drag out, the sun gets low in the sky and they’re anxious to move on to other things. Two types of cuts are especially likely to go wrong—bevel and angle cuts, which are chronically cut in the wrong direction.
What to do: Measure twice with bevel and angle cuts even if you don’t bother to do so with other cuts. This is especially important if the material you’re cutting is expensive and/or you don’t have much surplus on hand.

Mistake: Not prepping the subfloor before installing vinyl flooring. Installing vinyl flooring is well within many DIYers’ abilities, as long as they don’t make one common and critical mistake—failing to properly prep the subfloor. This step is easy to overlook when replacing flooring—the subfloor was fine for the prior flooring, so it stands to reason that it will be fine for the new flooring, too. But vinyl flooring shows subfloor ridges, dips and other imperfections much more than other flooring. And once vinyl flooring is installed, there’s little that can be done to fix subfloor issues without ripping up the flooring.
What to do: Before installing vinyl flooring, look for all imperfections by getting down on the subfloor with a flashlight and a long straight edge. Use subfloor leveling compound, which typically costs around $30 per gallon, and a floor sander, available for rent at many home centers, to correct any imperfections.
Warning: Don’t just lay a piece of vinyl flooring over a subfloor imperfection to gauge whether that imperfection will show through. It can take up to a month for subfloor flaws to appear in the vinyl floor on top.

Mistake: Sawing into a wall without knowing what’s inside. Cutting open a wall might be the simplest part of a repair or remodeling project, but it’s also the part that can cause significant damage—it’s easy to accidentally cut through wires or pipes inside the wall.
What to do: Before cutting, scan the wall with a stud finder that can identify not just studs and joists but also live electrical wires and both ferrous and nonferrous metal (a stud finder that warns only of ferrous metal won’t detect copper pipes). These high-quality stud finders—sometimes called multiscanners or wall scanners—are available at home centers or on Amazon for about $50.
Problem: No stud finder can identify every potential hidden hazard, however—for example, flexible PEX pipes might not register—so before cutting into a wall, examine both sides of it for plumbing or electrical fixtures in positions that suggest wires or pipes might be inside the wall.
If the layout of the house allows, also examine the base of the wall you’re about to cut into from the basement below…and/or the top of the wall from the attic above to see if there are any pipes or wires routed through that section of the wall.
If all seems clear, use a reciprocating saw with a short blade to cut a small pilot hole and peek inside. If this peek offers no cause for concern, you can use a more aggressive cutting tool to make the larger hole that the project requires.

Mistake: Working without directions. Experienced DIYers often disdainfully dispose of the directions when they are preparing to assemble furniture or install appliances—they consider following directions an insult to their DIY skills. But even if you already know how to assemble a bookshelf or install a ceiling fan, you probably don’t know how to assemble or install that particular bookshelf or ceiling fan. The task might feature steps that must be completed in a specific and less-than-obvious order…or require screws, bolts or other hardware that have subtle differences and must be used in specific spots. A lockset might include bolts of different lengths, with different bolts used depending on the exact width of the door, for example.
What to do: Review and refer to the directions even if you’re confident you don’t need them. There is no reason not to. If the directions are hard to understand, see if anyone has posted a video on YouTube showing how to assemble or install the item—watching assembly steps often is clearer than reading them.