Yoga is becoming more popular every year. In 2021, 35 million Americans tried the 5,000-year-old practice at least once in the previous year. Most people cite stress relief, enhanced fitness or injury rehabilitation as their reason for practicing. But one goal you don’t often hear is “stronger bones.” Most people think of strength-training, walking and other floor-pounding workouts when they hear “weight-bearing activity,” but yoga also can make your bones stronger. It stimulates bone cells in a similar way and often with less injury risk. It also improves balance and flexibility and decreases stress, all of which protect bones.
Your Busy Bones
You might think that bones are fixed, unchangeable objects. The truth is that bones, just like skin and muscles, are alive and constantly evolving. From childhood through the mid-20s, our bones are busy growing stronger. In our 30s and 40s, the body engages in a process called bone remodeling, in which old bone tissue is broken down and replaced with equal amounts of new bone. It’s even possible to gain bone mass during this time, albeit at a far slower pace than during your youth and only if you engage in regular weight-bearing exercise such as strength-training or jogging.
After age 50, as the rate of bone breakdown starts to outpace the rate of replacement, those bones that held you up for so long begin to weaken. And since estrogen is needed to help lay down new bone, this process speeds up even faster for women during menopause. The result often is a condition called osteopenia, which means your bones are thinner and less dense than normal. Osteopenia can progress to osteoporosis, a more severe form of bone loss. Approximately 54 million Americans have osteopenia or osteoporosis, dramatically increasing their risk for one or more fractures.
Yoga: A Pillar of Bone Health
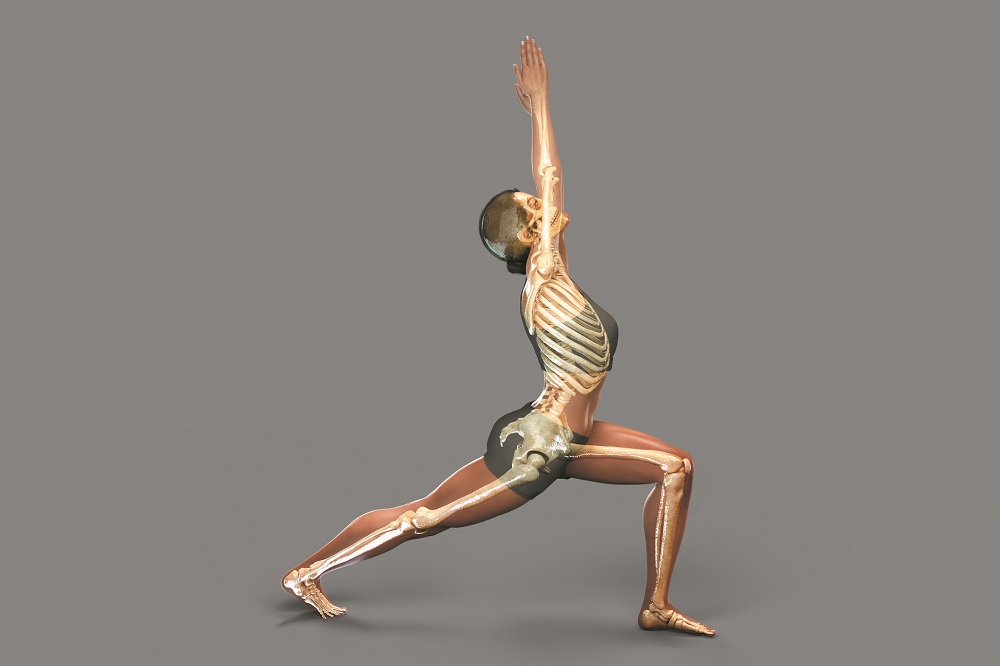
How yoga helps keep bones healthy…
Yoga makes bones stronger. When you hold a yoga pose such as Seated Spinal Twist pose (Ardha Matsyendrasana) or Triangle pose (Trikonasana), your muscles pull on your bones. That pressure stimulates osteoblasts, the cells that build bone. It’s similar to how weight-training strengthens bone—you lift a dumbbell or push against your own body weight in a lunge or a pushup, and the force of that weight pushes back and tugs on the bones, enhancing osteoblast activity. As muscles strengthen, they continue to exert more beneficial pressure on the bones, even when you’re at rest. Landmark research: Loren M. Fishman, MD, of Columbia College of Physicians and Surgeons in New York City has found that performing a daily 12-minute sequence of 12 yoga poses was sufficient to improve bone density in older adults’ spines and femurs. Some of his study participants even reversed their osteopenia or upgraded from osteoporosis to osteopenia. To view the exercises, go to https://bit.ly/3MDZlCV.
Yoga improves balance and flexibility. Consider a one-legged pose or even a two-legged pose with your feet staggered, such as Virabhadrasana II (Warrior II pose). You engage all your muscles to remain upright, so not only do you reap the weight-bearing benefit of standing up while pressing away from the floor (which stimulates osteoblasts), but you’re cultivating balance by challenging your proprioceptive system—internal sense of where your body is in space and what it is doing at any given time. Also the stretching inherent in yoga builds flexibility.
Yoga alleviates mental stress. When you’re overstressed, your body increases production of the hormone cortisol, which, in excess quantities, breaks down bone by inhibiting osteoblasts. Slow, deep breathing, like the kind practiced in yoga, dials down the sympathetic (“fight-or-flight”) nervous system, which reduces cortisol. Also, yoga poses cultivate an inner awareness of the body’s abilities—you must be mindful of where you’re placing your foot…where you’re gazing…where you’re holding your arms, all of which elevate mood. In this way, even a lying-down pose such as Savasana (Corpse pose) can benefit bones.
Poses for Bone Strength
Most yoga poses can help protect bones in some way. But when it comes to improving bone density, balance and flexibility, the three best are Tree pose (Vriksasana)…Warrior II pose (Virabhadrasana II)…and Downward-facing Dog pose (Adho mukha svanasana). All you need for these three poses is a standard yoga mat. It takes at least 10 seconds for bone-forming proteins to synthesize under pressure, so hold each pose for that length of time, eventually working your way up to 30 seconds.
Reminder: Talk to your health-care provider before starting an exercise plan, especially if you have been diagnosed with spinal osteoporosis. If so, you should avoid yoga moves that require you to roll up or down through the spine, such as Sun Salutations or backbend-type moves.
Pose #1: Tree pose. Stand with your feet hip-width apart and arms relaxed by your sides, weight balanced evenly between both feet. Spread your toes, and press your feet into the mat. Imagine your hip bones reaching up toward your lower ribs to gently lift your lower belly. Inhale deeply, lifting your chest, and exhale as you draw your shoulder blades down your back. Look straight ahead at a steady gazing spot. You are now in Tadasana (Mountain pose.)
Next, place your hands on your hips and raise your right foot high, resting it on your left inner thigh…or keep it lower and rest it on your left calf or ankle. Avoid resting it on your left knee. Press the right foot and left leg into each other. Check that your pelvis is level and squared to the front.
When you feel steady, bring your palms together at the center of your chest or stretch your arms overhead like tree branches for an added challenge. You are in Tree pose. Hold for five to 10 breaths, then step back into Mountain pose, and repeat on the other side. Feel free to use a wall or chair to steady yourself. Lightly touching your hand to the wall or even standing near a wall can give you confidence in case you lose your balance.

Pose #2: Warrior II pose. Begin by facing the long side of your yoga mat with your arms extended straight out from your shoulders (left arm out to the left and right arm out to the right.) Your feet should be parallel to each other in a wide stance with your ankles approximately beneath your wrists.
Keeping your upper body still, turn your right foot and knee to face one end of the mat. Angle your left toes slightly in toward the upper left corner of the mat. Now slowly turn your gaze in the same direction as your right foot. Bend your right knee, and position it over your right ankle, distributing your weight evenly between both legs. Press down through the outer edge of your back foot. Reach strongly through both arms toward the front and back of the mat as you look past your right fingertips. Hold for five to 10 breaths.
To emerge from the pose, exhale as you press down through your feet, then inhale and straighten your legs. Return your feet to parallel facing the long side of the mat. Repeat on the other side.

Pose #3: Downward-facing Dog pose. Begin on your hands and knees, knees beneath your hips, hands a bit in front of your shoulders and fingers spread. Pressing into your hands, raise your knees off the mat, taking your hips up and back to come into an upside down “V” shape.
Keeping your knees softly bent, press through your hands and extend your spine, drawing your tailbone back and up. Firm your shoulder blades against your back…imagine drawing your ribs toward your thighs…keep your neck long and ears between your upper arms.
Engage your thigh muscles as you press your thighs back and stretch your heels toward the floor. (Legs should be straight but knees should not be locked.) If you feel your spine rounding, keep the knees bent. Hold for five to 10 breaths. To emerge from the pose, exhale and bring your knees to the floor.